Wednesday 16 January 2013

Spicy Vegetable Skewers

Hello,

Today's recipe is one that I found in the fabulous book, Vegan Fire and Spice by Robin Robertson, called "Spicy Skewered Vegetable Kebabs". I have made some changes with the quantities etc, so I hope you enjoy my interpretation.

Note: The original recipe calls for rapeseed oil in the marinade, but I left this out, not because I'm a culinary genius, but because I forgot! However, the marinade still infused with the veggies extremely well, and the kebabs weren't at all dry. So, if you want a low-fat option, go ahead and omit the oil.

Ingredients


  • 1/2 Courgette
  • 3 mushrooms, halved
  • 4 vegan prawns, defrosted (the same I used in this post)
  • Half a red onion
  • 1 orange/red pepper
  • 3 cloves garlic
  • Juice of 1 lemon
  • Spices: ground coriander, ground cumin, cayenne pepper (1/4 tsp each)
  • 1/4 tsp salt
Makes 4 skewers
Calories: 42 calories per skewer approx

Method

  1. If using wooden skewers, soak them in water for 30 mins before cooking to prevent burning.
  2. Peel and crush the garlic. In a mixing bowl, combine the crushed garlic with the lemon juice, ground cumin, ground coriander, cayenne pepper and salt. Set aside.
  3. Chop your veggies into bitesize pieces. Put these and the prawns in the bowl with the marinade and coat thoroughly with the marinade. Leave the marinade to soak in with occasional stirring.

  1. Arrange your veggies and prawns on the soaked skewers in the most attractive way you can. Pop on a baking tray and bake at Gas Mark 6 for 20 - 25 mins or until the veggies are tender.

The Result


I served up my skewers with brown rice which I flavoured with a tablespoon of sesame oil. The vegetables are tender, and the mushrooms and prawns soaked up the marinade especially well. I didn't miss the oil at all - nothing was dried out and it all went down well.

I can't recommend the recipe book where this came from enough, it's full of fantastic recipes for vegans with a passion for flavour!

Hope you enjoy it!

Callum


Sneak preview

Here is a quick sneak preview of a recipe which will be on the way soon. This was my first attempt (my dad is very good at these but I don't have the knack yet....) and my recipe isn't ready to be shared yet. Keep your eyes peeled for a blog-ready recipe soon....


Callum

Sunday 6 January 2013

Tom Yum Soup

Hello, and happy new year!

My next recipe is a Thai soup called Tom Yum, and it's one of my favourites. Often given as a starter in Thai restaurants, I think it serves just as well as a main with a bit of tasty flatbread for dipping. 


As much as I would love to say I made this from scratch... I didn't. I bought the soup base as a paste from B&M. It's quite rare that a vegan can do that, because 90+% of the pre-packaged pastes contain fish or prawns. In restaurants, the soup typically contains whole prawns as well, but these can be omitted and replaced with fresh mushrooms. In this case, I used mushrooms and vegan prawns - Yes, vegan prawns!! I got these from a website called Veggie World, who have very good service despite a somewhat antiquated payment system.

I just followed the recipe on the jar of paste, so this is less a recipe and more of a review of an existing recipe. Nonetheless, I would recommend it.

Ingredients


  • Tom Yum paste
  • 70 g Coconut milk
  • 4 Chestnut mushrooms, quartered (these must be very fresh!)
  • 4 Vegan prawns
  • Veg oil
  • A little fresh coriander for garnishing

The Method

As I said, I just followed the recipe on the jar! If you are using a pre-bought paste, you should do the same. 

It was just a case of frying the paste in a little oil for 30 secs or so, then adding the coconut milk (70 g), followed by the prawns and mushrooms on boiling. This was allowed to simmer until all the ingredients were cooked. The soup was transferred to a bowl, and garnished with fresh coriander.


The Result


Beautiful Thai soup with that classic coconut-lemongrass flavour. This took me around 20 mins to make from start to finish, so the convenience factor was high as well! I enjoyed this with a bit of Kurdish flatbread to dip - maybe not a classic combination, but fusion cooking is all the rage these days!

Hope you're lucky enough to have a local B&M - if you do, I can highly recommend this delicious paste. Also, the vegan prawns are worth trying - although the delivery cost through this company is high, it's worthwhile if you buy a few items at a time.

Enjoy!

Callum

Wednesday 12 December 2012

Savoury Vegetable Crumble

Hello,

Think crumbles are deserts? Think again! Savoury crumbles can be fabulous, a lovely warming treat for the winter months.

Ingredients


  •  Whatever vegetables you have to hand - I used
    • Onion
    • Celery
    • Mushrooms
    • Leek
    • White cabbage
    • Swede
    • Green leaves
    • Spinach
    • Carrot
  • Handful of red lentils
  • Vegetable oil (not pictured)
  • Mixed dried herbs
  • 500 g Sieved tomatoes (passata)
  • 1.5 oz Vegan hard margarine
  • 3 oz plain white flour
  • 1 oz vegan cheese

Method

  1. Chop up your veggies into strips, cubes, or whatever feels right! Fry these in a large pan with a little vegetable oil until soft.


  1. When the veggies are ready, add the passata and stir in. Throw in a handful of lentils and stir through. Add some water for the lentils to soak up, and leave to simmer. Stir from time to time, and add water as necessary until the lentils are cooked. Add mixed herbs and seasoning to taste.


  1. In the meantime, make your crumble topping. Weigh out the flour in a mixing bowl, and add the margarine in cubes. Rub the flour and butter together until the mixture resembles fine breadcrumbs. Stir in the grated cheese.


  1. When the lentils are cooked, it's time to put it all together! Tip your veggie mixture into an ovenproof dish and flatten the top with a wooden spoon. Now sprinkle the topping all over the mix evenly. Pop the dish in the oven at Gas Mark 6 for around 15 mins or until the topping is crisp. Don't let the topping brown too much!

The Result


 The topping should be lovely and crisp, and the cheese melts a little and adds a beautiful creamy flavour. If you have some left, it can be stored in it's dish or in tupperware in the fridge for at least 3 days or so.


The crumble can be served as I did with fresh, soft vegan tiger bread. I imagine roast potatoes would also be a good choice!

I hope this recipe brings you much pleasure!

Vegan love,
Callum 

Monday 10 December 2012

Vegan Steak and Onion Pies (I'm back!)

Hello, I'm back!

I've been occupied with some other important stuff recently, but I am back with a vegan vengeance, and I will more than make up for my absence with this recipe! Honestly, I don't exaggerate when I say that this is the best experiment that I've tried since turning vegan 12 months ago. Easy, quick-ish, and just a few ingredients needed. And did I mention totally delicious?

Ingredients


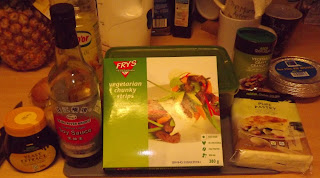
  • Vegan steak strips (I used Fry's Vegetarian Chunky Strips)
  • Soy sauce (optional)
  • Yeast extract (optional, but you'll want to use it!)
  • Vegan gravy granules
  • White onions
  • Vegetable oil
  • Vegetable stock, preferably homemade (see mine here)
  • Shop-bought puff pastry
  • Some suitable foil pie tins

The Method

  1. First, chop your onions into thin strips, then fry your steak strips and onion strips and in a little vegetable oil until lightly browned.


  2. Next, it's gravy time - add to the pan your vegetable stock (enough to almost cover your steak strips), stir in a generous teaspoon of yeast extract and a good splash of soy sauce, then stir in the gravy granules until the desired thickness is reached.


  3. All that's left to do now is to roll out your pastry. Roll it to a thickness of about 3 - 5 mm, then for each pie cut a larger circle to form the base of your pie, and a smaller circle to form the lid. Fill each pie with a decent ladle. Now, using a little water on the end of your finger, wet the edge of the pastry around the filling and pop the lid on top. Pinch all around the outside to seal. When sealed, cut a couple if slits into the lid with a sharp knife to let the steam out during cooking.


  4. Finally, bake! You should follow the instructions from the pastry packet - I baked these at Gas Mark 6 for around 20 mins.

TOP TIP!!!

Don't you hate it when you've cut out all the circles that your rolled-out pastry can fit, but there is still loads of pastry left? Yes, you could re-roll it, but it's never the same! Well, I have a plan to solve this issue - semi-circles!!


If there's no room for a full circle, just cut two semi-circles with a strip of pastry to bind the two together. Then, just lay the two parts of the lid over the top of the pie and, using a finger-full of water, bind the two together with the strip. The same can be done with the base. Problem solved!


The Result


I never thought I would eat a steak pie again, and it's true, I won't, but this is as good (or maybe better!) in my opinion! I marked this one with a "C" for my name - that's another thing you can do with your pastry scraps!


I was a bit naughty - I'm afraid I served up my lovely pie with chip-shop chips and mushy peas. Unhealthy but decadent and totally worth it!

Freezing

The pies can be frozen after assembly but before cooking, but I would recommend that you defrost them before cooking. I tried this and cooking straight from frozen, and although the frozen pie was fine, the defrosted version was definitely superior.


Give them a try, and I hope you enjoy them!

Callum

Sunday 4 November 2012

Vegan Chocolate Chip Cookies

Hello (for the second time today!),

It's Sunday, and clearly I have too little to do, because I'm doing more baking! Chocolate chip cookies are on the agenda today, because I'm yet to find a vegan shop bought cookie which satisfies me.

The original recipe can be found here.

Ingredients 

  • 1 cup plain flour
  • 1 tsp baking powder
  • 1/4 tsp salt
  • 1/2 tsp cinnamon
  • 1/2 cup vegan chocolate chips
  • 1/2 cup sugar
  • 1/4 cup sunflower oil (or any flavourless vegetable oil)
  • 1/2 tsp vanilla essence
  • 1/4 cup water
This is enough to make around 10 medium-large cookies. It would be really easy to double up the recipe if you want more (I would recommend it if you intend to share, they won't last long!).

The Method

  1. Mix your dry ingredients excluding the sugar in a bowl. Make a well in the centre.

  2. In a separate bowl or jug, mix the sugar with the wet ingredients

  3. Pour the wet ingredients into the well in the dry ingredients, and combine thoroughly (but don't overwork it or the gluten will break down in the flour, and this will make the batter a bit bread-like!).

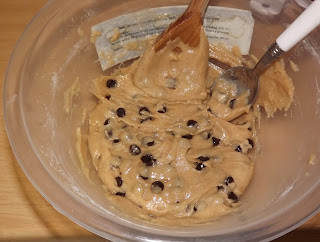
  4. Take a tablespoon of batter at a time, and put blobs onto a lined baking sheet (no greasing necessary).
  5. Bake in a pre-heated oven at Gas Mark 4 for 9 - 15 mins (all ovens are different, but mine took about 11 mins).

The Result


These cookies look quite pale, but I prefer a nice chewy cookie, so I took them out quite early. If you like a tougher, more biscuit-like cookie, you could leave them in a little longer (but not much longer!). Be warned - when the cookies cool, they will harden considerably, so make sure they are soft when they come out of the oven. you may think they are undercooked, but trust me, they will toughen up.
I think these would be really easy to adapt. For example, you could substitute some or all of the chocolate chips with chopped nuts or sultanas. You could also try adding citrus peel, or some cocoa powder to make these double chocolate chip cookies (how exciting!). If you do give that a go, let me know how it works out!

Yours,
Callum

Wholemeal Bread

Hello,

For the first time in years, I thought I would give bread a go. Bread is not difficult to find for vegans, but you still need to be wary, because some of them sneak in little fillers like skimmed milk powder or whey powder. Anyway, there's nothing to beat the smell of homemade bread wafting through your house, or the satisfaction of dipping a hearty chunk of it in your soup.

The bread I made was based on this recipe, but I adapted it to my own taste and the ingredients I had to hand.

Ingredients

  • 500g strong wholemeal flour
  • 1 tbsp dried yeast
  • 0.5 tsp salt
  • 1 tsp sugar
  • 325 ml warm water
  • 1 tbsp olive oil
  • a handful of sunflower seeds

Method

  1. First, prepare the yeast. This should be done according to the instructions on the pack. The yeast that you use will give you an idea of how much yeast you need for the amount of flour you are using and exactly how to prepare it. In my case, I used Allison brand Dried Active Yeast. This needs reactivating by whisking 1 tbsp into a mixture of warm water (150 ml) and sugar (1 tsp). This mix is left in a warm place for about 15 mins until a froth forms on the surface.
  2. In the meantime, mix the flour, salt and the sunflower seeds. Add the yeast and the remaining warm water before chopping together roughly with a knife.While the dough is still a bit lumpy, add the olive oil and mix in well. Now get your hands in and knead it until all the flour has been taken up and the edges of the mixing bowl are fairly clean.
  3. Cover the bowl with a clean tea towel and leave in a warm place for around an hour, or until the dough has doubled in size.
  4. Turn the dough out onto a floured surface. Knead the dough firmly for several minutes - about 10 should be enough. The dough will become less and less sticky as you knead. To see if it's ready, lightly press your thumb into the dough. If it springs back, then the dough is ready.
  5. Shape it however you want - I put most of the dough in a lined loaf tin, but also reserved a little and made two small batons. Coat lightly in flour.
  6. Leave in a warm place for another hour or so.

  7. My little batons, ready to go in the oven after the extra rising


    My loaf, post-rise, ready to hit the oven
  8. Bake in a preheaten oven at Gas Mark 7 for 35 - 40 mins. Readiness check - lightly tap the underside of the loaf/batons. If the sound is hollow, the bread is ready!

The Result

The bread came out beautifully in both forms. This recipe gives quite a dense bread, and it feels just like bread used feel! Although this is delicious, I think next time I'll aim for a lighter loaf. Maybe I'll double the yeast, or leave to rise for longer.


    So I hope you give this a go - the mass-marketed bread is so often full of preservatives and other assorted rubbish. Anyway, the satisfaction factor alone is enough to make this worthwhile!

    Also, this recipe looks really easy to adapt. Try mixing different seeds or grains in with the flour at the start, or even dried fruit - I'm sure it would work a treat!

    PS. Pasty Update!

    Remember when I wrote my pasty recipe and I said that I froze some uncooked? Well, I tried baking the frozen batch in two different ways - straight from frozen, and after defrosting overnight. Both worked fine, but the straight-from-frozen batch lacked the flakiness of the originals. The pastry on the inside was a little soggy, and although it was perfectly palatable (I've certainly had worse), I would recommend deforsting first. The defrosted pastries came out just as good as the fresh ones!

    Yours,
    Callum