Wednesday 12 December 2012

Savoury Vegetable Crumble

Hello,

Think crumbles are deserts? Think again! Savoury crumbles can be fabulous, a lovely warming treat for the winter months.

Ingredients


  •  Whatever vegetables you have to hand - I used
    • Onion
    • Celery
    • Mushrooms
    • Leek
    • White cabbage
    • Swede
    • Green leaves
    • Spinach
    • Carrot
  • Handful of red lentils
  • Vegetable oil (not pictured)
  • Mixed dried herbs
  • 500 g Sieved tomatoes (passata)
  • 1.5 oz Vegan hard margarine
  • 3 oz plain white flour
  • 1 oz vegan cheese

Method

  1. Chop up your veggies into strips, cubes, or whatever feels right! Fry these in a large pan with a little vegetable oil until soft.


  1. When the veggies are ready, add the passata and stir in. Throw in a handful of lentils and stir through. Add some water for the lentils to soak up, and leave to simmer. Stir from time to time, and add water as necessary until the lentils are cooked. Add mixed herbs and seasoning to taste.


  1. In the meantime, make your crumble topping. Weigh out the flour in a mixing bowl, and add the margarine in cubes. Rub the flour and butter together until the mixture resembles fine breadcrumbs. Stir in the grated cheese.


  1. When the lentils are cooked, it's time to put it all together! Tip your veggie mixture into an ovenproof dish and flatten the top with a wooden spoon. Now sprinkle the topping all over the mix evenly. Pop the dish in the oven at Gas Mark 6 for around 15 mins or until the topping is crisp. Don't let the topping brown too much!

The Result


 The topping should be lovely and crisp, and the cheese melts a little and adds a beautiful creamy flavour. If you have some left, it can be stored in it's dish or in tupperware in the fridge for at least 3 days or so.


The crumble can be served as I did with fresh, soft vegan tiger bread. I imagine roast potatoes would also be a good choice!

I hope this recipe brings you much pleasure!

Vegan love,
Callum 


Monday 10 December 2012

Vegan Steak and Onion Pies (I'm back!)

Hello, I'm back!

I've been occupied with some other important stuff recently, but I am back with a vegan vengeance, and I will more than make up for my absence with this recipe! Honestly, I don't exaggerate when I say that this is the best experiment that I've tried since turning vegan 12 months ago. Easy, quick-ish, and just a few ingredients needed. And did I mention totally delicious?

Ingredients


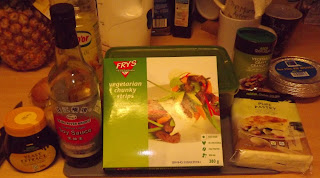
  • Vegan steak strips (I used Fry's Vegetarian Chunky Strips)
  • Soy sauce (optional)
  • Yeast extract (optional, but you'll want to use it!)
  • Vegan gravy granules
  • White onions
  • Vegetable oil
  • Vegetable stock, preferably homemade (see mine here)
  • Shop-bought puff pastry
  • Some suitable foil pie tins

The Method

  1. First, chop your onions into thin strips, then fry your steak strips and onion strips and in a little vegetable oil until lightly browned.


  2. Next, it's gravy time - add to the pan your vegetable stock (enough to almost cover your steak strips), stir in a generous teaspoon of yeast extract and a good splash of soy sauce, then stir in the gravy granules until the desired thickness is reached.


  3. All that's left to do now is to roll out your pastry. Roll it to a thickness of about 3 - 5 mm, then for each pie cut a larger circle to form the base of your pie, and a smaller circle to form the lid. Fill each pie with a decent ladle. Now, using a little water on the end of your finger, wet the edge of the pastry around the filling and pop the lid on top. Pinch all around the outside to seal. When sealed, cut a couple if slits into the lid with a sharp knife to let the steam out during cooking.


  4. Finally, bake! You should follow the instructions from the pastry packet - I baked these at Gas Mark 6 for around 20 mins.

TOP TIP!!!

Don't you hate it when you've cut out all the circles that your rolled-out pastry can fit, but there is still loads of pastry left? Yes, you could re-roll it, but it's never the same! Well, I have a plan to solve this issue - semi-circles!!


If there's no room for a full circle, just cut two semi-circles with a strip of pastry to bind the two together. Then, just lay the two parts of the lid over the top of the pie and, using a finger-full of water, bind the two together with the strip. The same can be done with the base. Problem solved!


The Result


I never thought I would eat a steak pie again, and it's true, I won't, but this is as good (or maybe better!) in my opinion! I marked this one with a "C" for my name - that's another thing you can do with your pastry scraps!


I was a bit naughty - I'm afraid I served up my lovely pie with chip-shop chips and mushy peas. Unhealthy but decadent and totally worth it!

Freezing

The pies can be frozen after assembly but before cooking, but I would recommend that you defrost them before cooking. I tried this and cooking straight from frozen, and although the frozen pie was fine, the defrosted version was definitely superior.


Give them a try, and I hope you enjoy them!

Callum